My son makes comic books by drawing directly in small books. Printing another copy should be easy, but the physical book is a pain to put into a copier. Pages do not sit flat, the center is hard to capture, and every copy takes a bunch of manual positioning.
The Comic Book Creator already solved the other half of this problem. It can arrange normal pages into printer sheets so the result folds in the middle and reads in the right order. I wanted to keep that print path and add a simpler way to get an existing hand-drawn comic into it: photograph each page, tune it for a black-and-white laser printer, and print the whole book again.
Keep the print algorithm, change the page content
The useful boundary was already in the app. A comic page is rendered by the same ComicPaper component in the editor and in the print-only booklet sheets. The booklet code decides which logical page belongs on the left and right side of each physical sheet. It does not need to know whether the page contains panel outlines, speech bubbles, or a photograph.
That meant the new mode did not need a second printing system. It needed a new kind of page content that could render inside the existing paper dimensions.
The first version treated the uploaded image as a full-page background. A phone or file picker sends a JPEG, PNG, or WebP to an API route. The server writes the binary file under the existing application data directory and stores only the image metadata in the comic book JSON. Docker already mounts /app/data as a persistent volume, so the photos live beside the book records without adding another service.
Each saved image keeps the source filename and URL along with its position, size, rotation, fit mode, and print treatment. Older books still load through the same server-side normalization path. When the data shape moved from one image to an ordered array of image layers, that normalization step also became the migration from the old single-image field.
Making a phone photo printable
A phone photo and a laser-printer page have different failure modes. The photo can have uneven light, gray paper, shadows near the spine, or dark colors that look fine on screen and turn into a large block of toner.
I added three treatments:
- Color leaves the source alone.
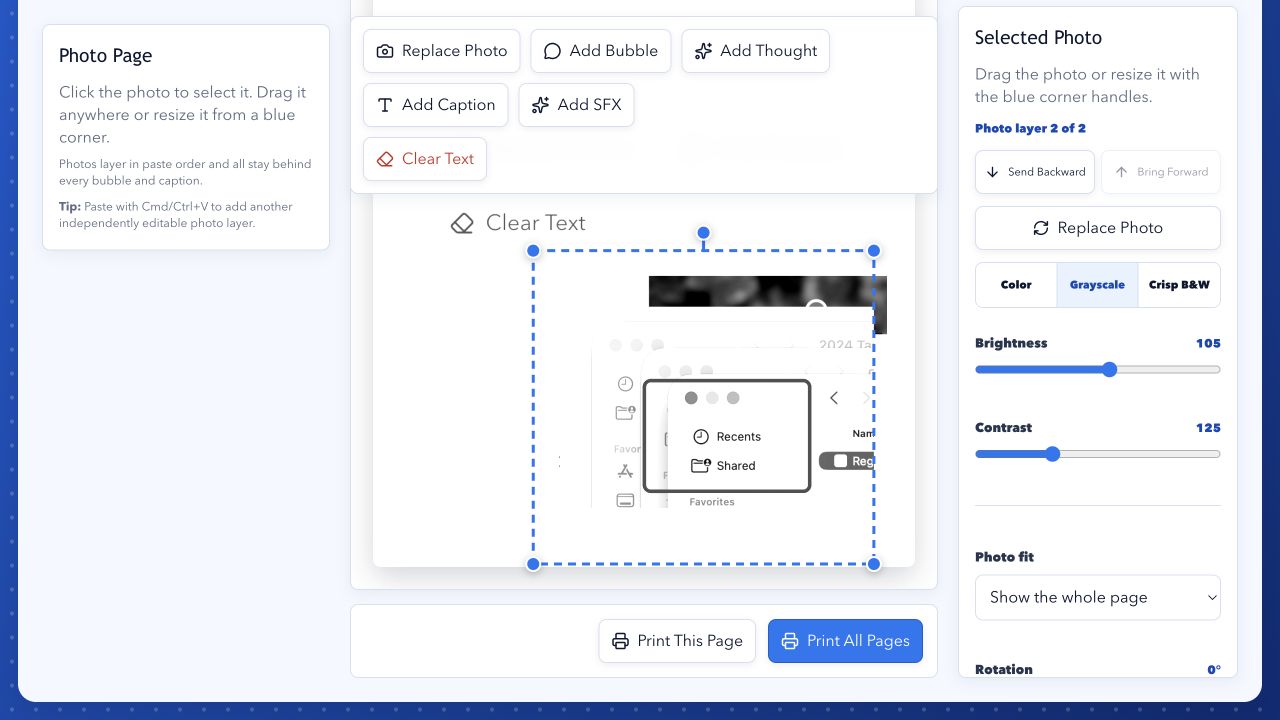
- Grayscale removes saturation and exposes brightness and contrast controls.
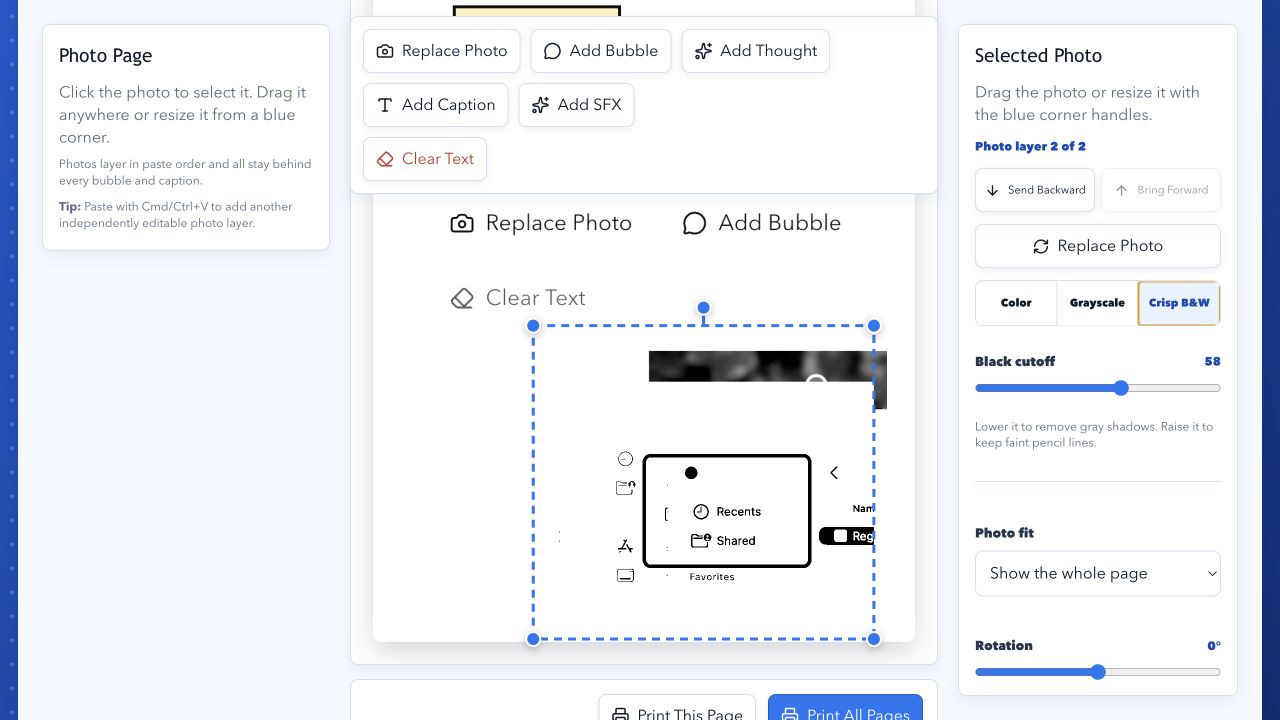
- Crisp B&W turns the page into black and white with an adjustable cutoff.
The rendering stays inside SVG. Grayscale starts with an feColorMatrix saturation filter. Brightness and contrast use linear component-transfer functions. The black-and-white mode uses a discrete component transfer table: values below the selected cutoff become black and values above it become white.
The cutoff is the useful control for pencil drawings. Lowering it removes light gray shadows and paper texture. Raising it keeps fainter pencil marks, at the cost of letting more background noise become black. There is no universal right value because the answer depends on the drawing, the room lighting, and the printer. The important part is that the adjustment happens on the actual printable page before using paper and toner.
The image needed to become a real object
The first controls for positioning the photo were sliders for size and horizontal and vertical movement. They worked, but they were terrible. The rest of the editor already had a better interaction model: select an object on the page, drag it, resize it from the corners, and rotate it from a handle.
The photo now uses that same model. Each image layer stores x, y, width, height, and rotation in page-relative coordinates. Clicking the image selects it. Dragging moves it. Four blue handles resize the bounding box, and a rotation stem changes the angle. The right inspector switches from text settings to the selected photo's grayscale, threshold, fit, and rotation controls.
Images render before panels and text in the SVG, so bubbles and captions stay above the entire photo stack. Within the stack, array order is layer order. The inspector can send a photo backward or bring it forward. Reset as Background returns the selected image to a full-page, zero-rotation box and moves it to the bottom of the image stack.
That direct manipulation matters more once a page has several photos. The interface should expose the object you are changing, not make you translate a visual adjustment into three unrelated sliders.
Pasting became the fast path
The camera picker is useful on a phone, but paste is the faster path when the images are already on a computer. The editor listens for pasted image files unless focus is inside a text input. Each Cmd/Ctrl+V uploads another image and adds it to the current page as a new selected layer.
Pasting never replaces the current image. The first image can fill the page. Later images start smaller and slightly offset so the existing layers remain visible. Every pasted layer gets its own transform and print treatment, and concurrent uploads are tracked independently so several pasted images can all finish without being routed into the wrong action.
The explicit Replace Photo action still exists for replacing the source of one selected layer while preserving its position and treatment. Paste means add. Replace means replace. Keeping those actions separate made the behavior much easier to trust.
What this adds to the workflow
The app can now handle two kinds of comic creation without changing its printing model. A page can be built from panel templates and text objects, or it can begin with one or more photographs of something drawn on paper. Both become the same logical page by the time the booklet imposition code sees them.
The resulting workflow is direct:
- Photograph or paste the hand-drawn pages.
- Move, crop, resize, or rotate each image on the printable page.
- Choose grayscale or crisp black and white and tune the drawing for the printer.
- Add bubbles or captions if useful.
- Print the imposed sheets, fold them in the middle, and get another copy of the book.
The goal was not to redraw a paper comic inside a digital editor. It was to remove the copier from the workflow while preserving the thing that already worked: normal paper, a fold in the middle, and pages in the right order.
- Project: Comic Book Creator
- Source: byronwall/comic-book-creator