The bug report was simple: background removal was too aggressive. A stuffed animal had a light tan appendage sitting on a similarly colored carpet, and the cutout was dropping part of the animal. The model was close enough to be frustrating. It found most of the bear, but the right-side appendage was floating or partly missing instead of connected to the torso.
This is the kind of image problem where a single output is not very useful. You need to see failure modes side by side. I wanted to know whether the right fix was a rembg option, an alpha-matting threshold, a preprocessing step, or a post-processing pass on the mask.
The final production change was small: use rembg to produce a mask, threshold that mask aggressively, then grow, shrink, and feather it before applying it as alpha. Getting there took a few contact sheets.
Starting from the real upload
The first step was to test against the actual uploaded image rather than a simplified fixture. The app stores three image paths for each animal:
images/original/...for the raw uploadimages/display/...for the prepared display JPEGimages/processed/...for the transparent PNG cutout
The processed URL had enough information to derive the original and display URLs. The image endpoint is passcode-protected, but it also accepts the same hashed zoo passcode header that the app uses internally, so I downloaded the raw upload, the display image, and the current processed PNG into a temporary calibration folder.
That mattered because the raw image had the real source of the problem: a handmade tan bear against a tan carpet. The right appendage was close in color and texture to the background. Any tuning that worked only on a clean sample would be false confidence.
First sweep: alpha matting knobs
The current helper service was using rembg with alpha matting:
REMBG_OPTIONS = {
    "alpha_matting": True,
    "alpha_matting_foreground_threshold": 225,
    "alpha_matting_background_threshold": 15,
    "alpha_matting_erode_size": 6,
}
So the first contact sheet varied the obvious controls: foreground threshold, background threshold, and erode size. I also included the downloaded production output and a no-alpha-matting run.
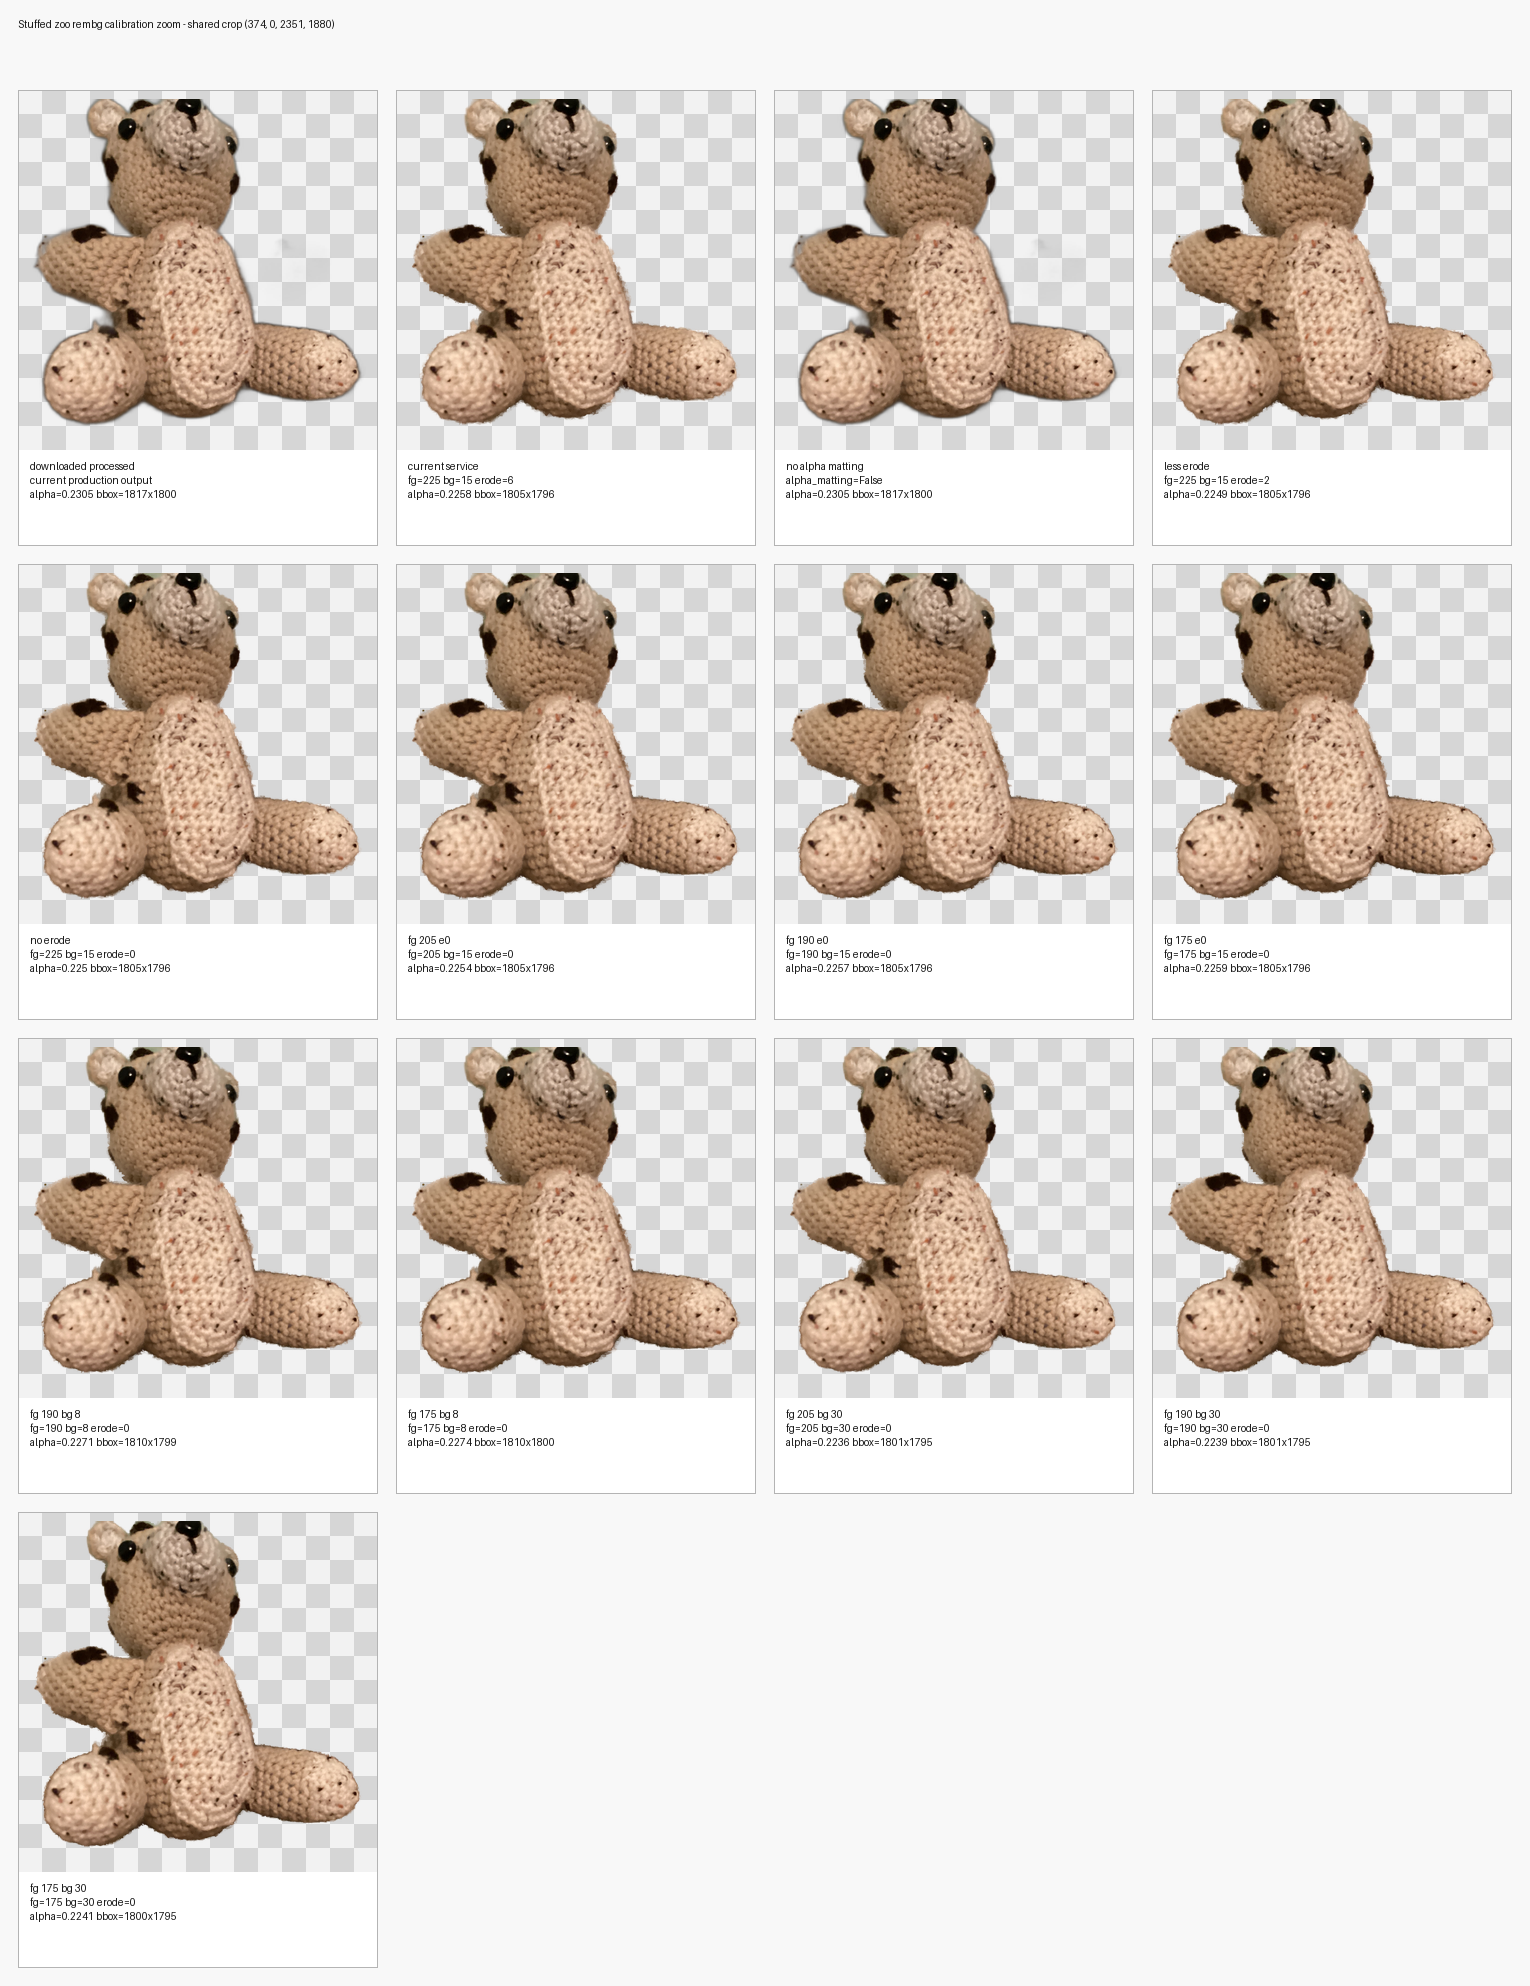
The result was mostly a dead end. The images looked almost identical. The bounding boxes and alpha coverage moved slightly, but the missing appendage problem did not meaningfully change.
That was the first useful conclusion: the base segmentation mask was dominating the result. Alpha matting could polish an edge that the model already believed in, but it could not recover a low-confidence body part that the model barely separated from the carpet.
Stress sweep: make it shine and fail
The next sheet intentionally made the settings wider. Instead of only varying alpha matting, I pulled the raw rembg mask and applied blunt post-processing operations:
- mask threshold at
1,24,64,128,192, and232 - mask grow by
5pxand15px - mask shrink by
5pxand15px - feathered threshold variants
- rembg no-matte, current matte, and post-processed mask outputs
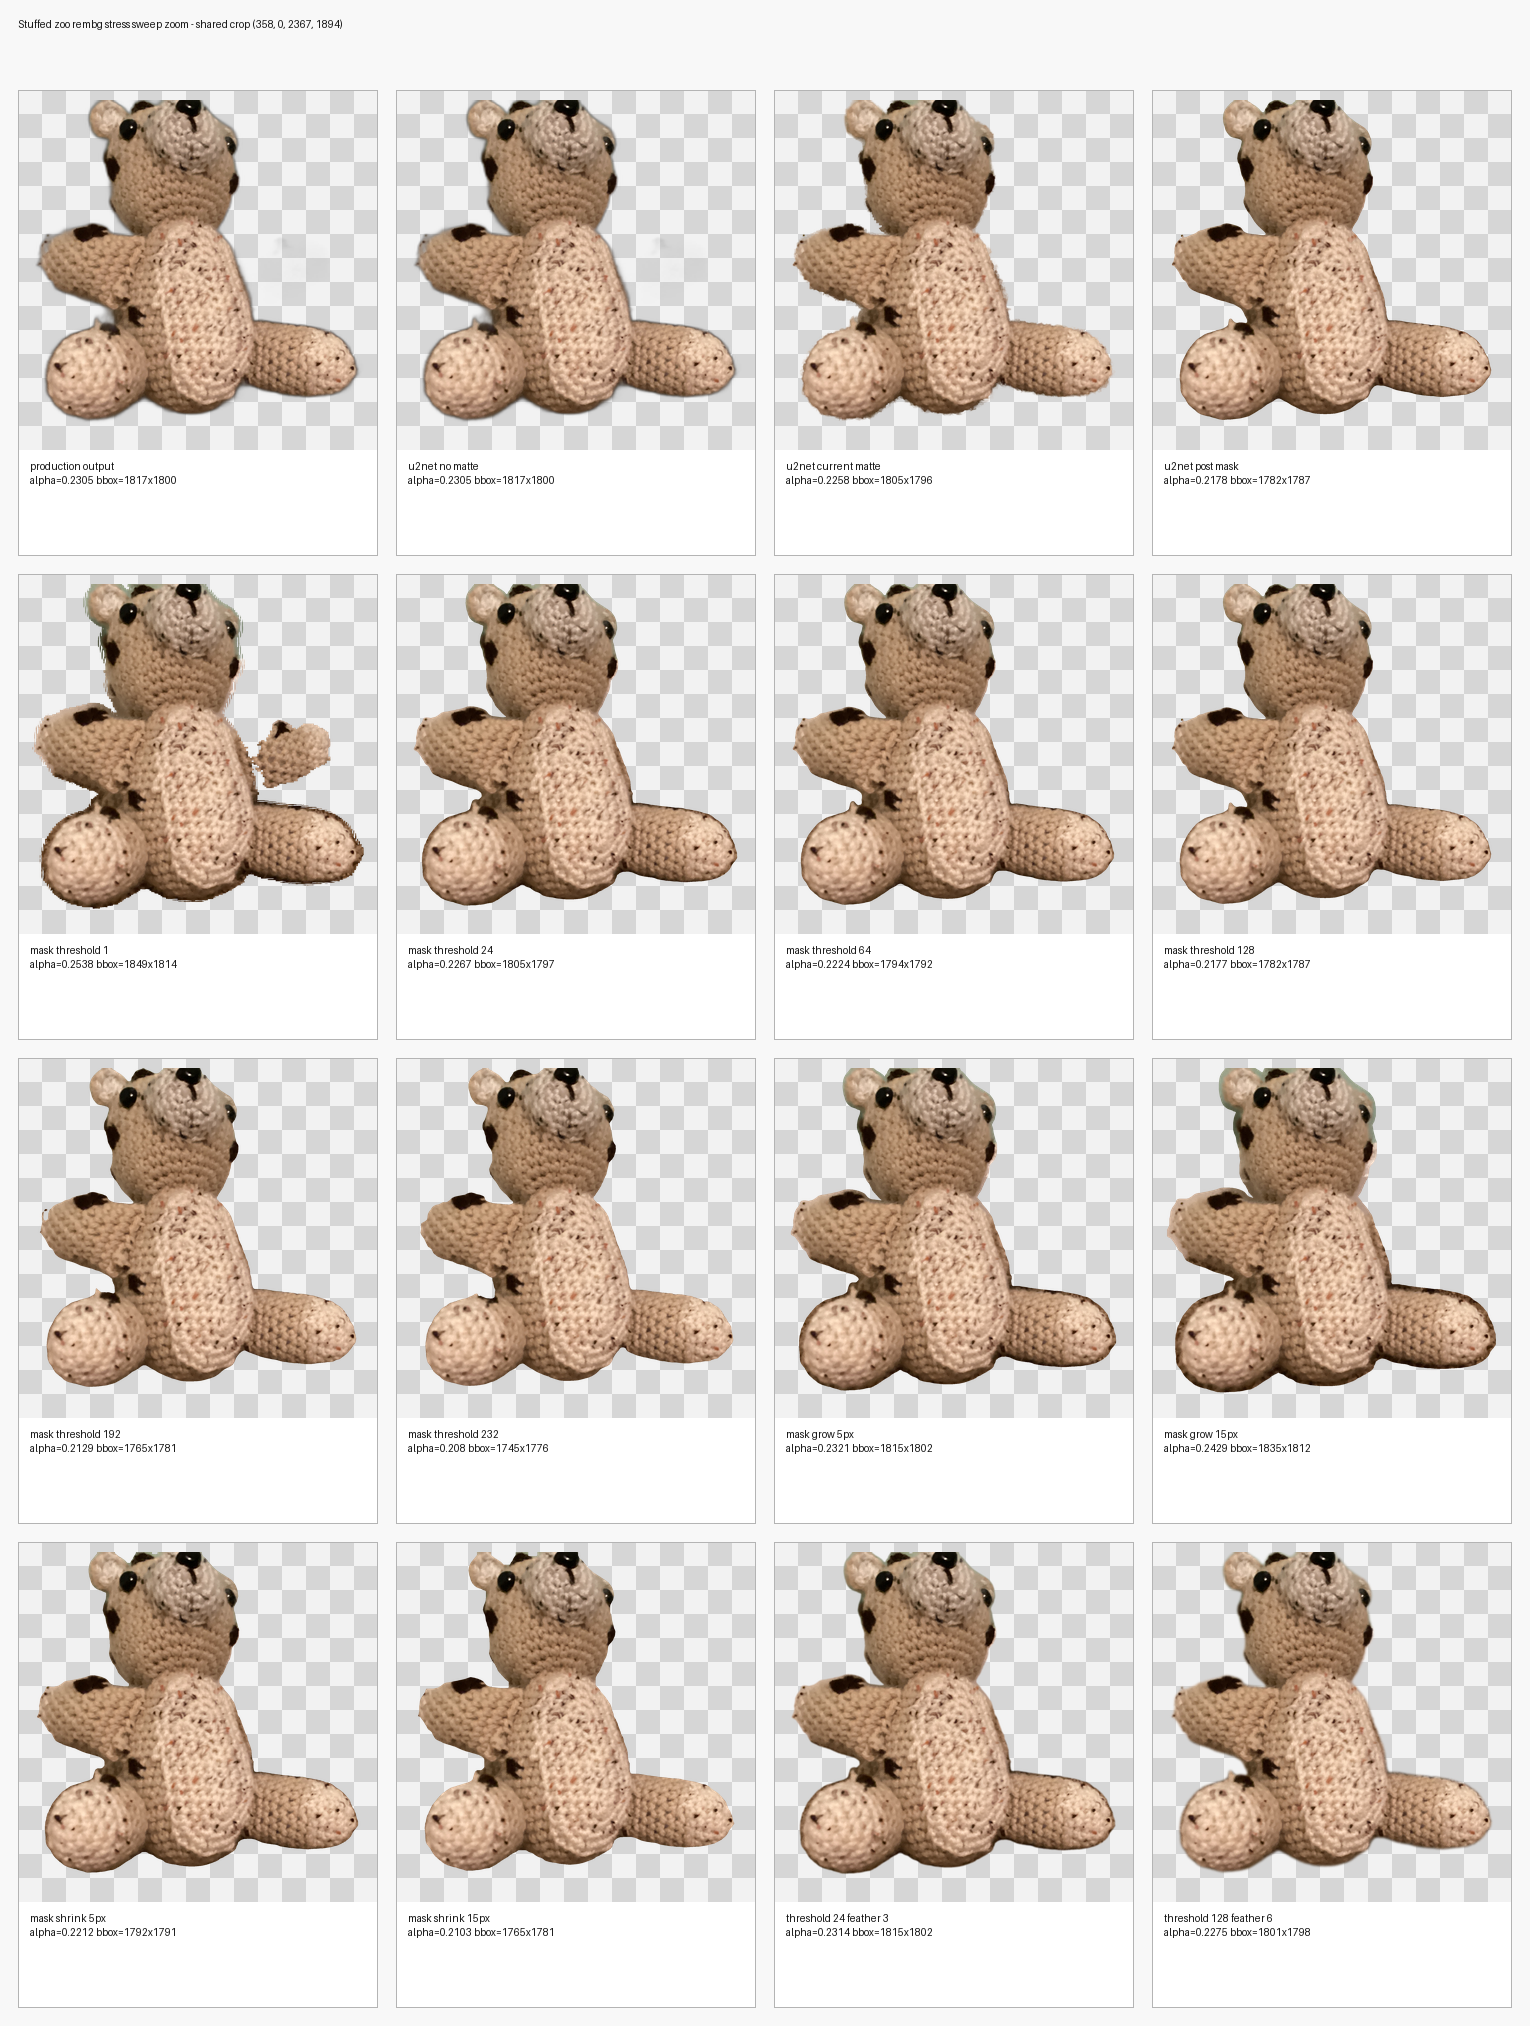
This sheet was much more informative. mask threshold 1 was the first variant that exposed the missing right-side appendage. It also kept more junk, which was expected. High thresholds and shrink operations showed the opposite failure mode: cleaner edges, but more of the bear disappeared.
That changed the shape of the problem. The model had not completely missed the appendage. It had assigned it very low confidence. The useful strategy was to preserve low-confidence mask regions and then clean up the consequences.
The marked problem area
A screenshot of the contact sheet made the issue obvious. In the mask threshold 1 variant, the right appendage appeared, but the connector between the torso and appendage was still fragile. The body part was almost there, just not reliably attached.
So I narrowed the probe to that area. I took the threshold 1 mask as the base and tried repair operations around the right side:
- region grow/shrink closing
- bridge operations between nearby components
- color-based rescue constrained to the marked area
- feathered versions of the better region repairs
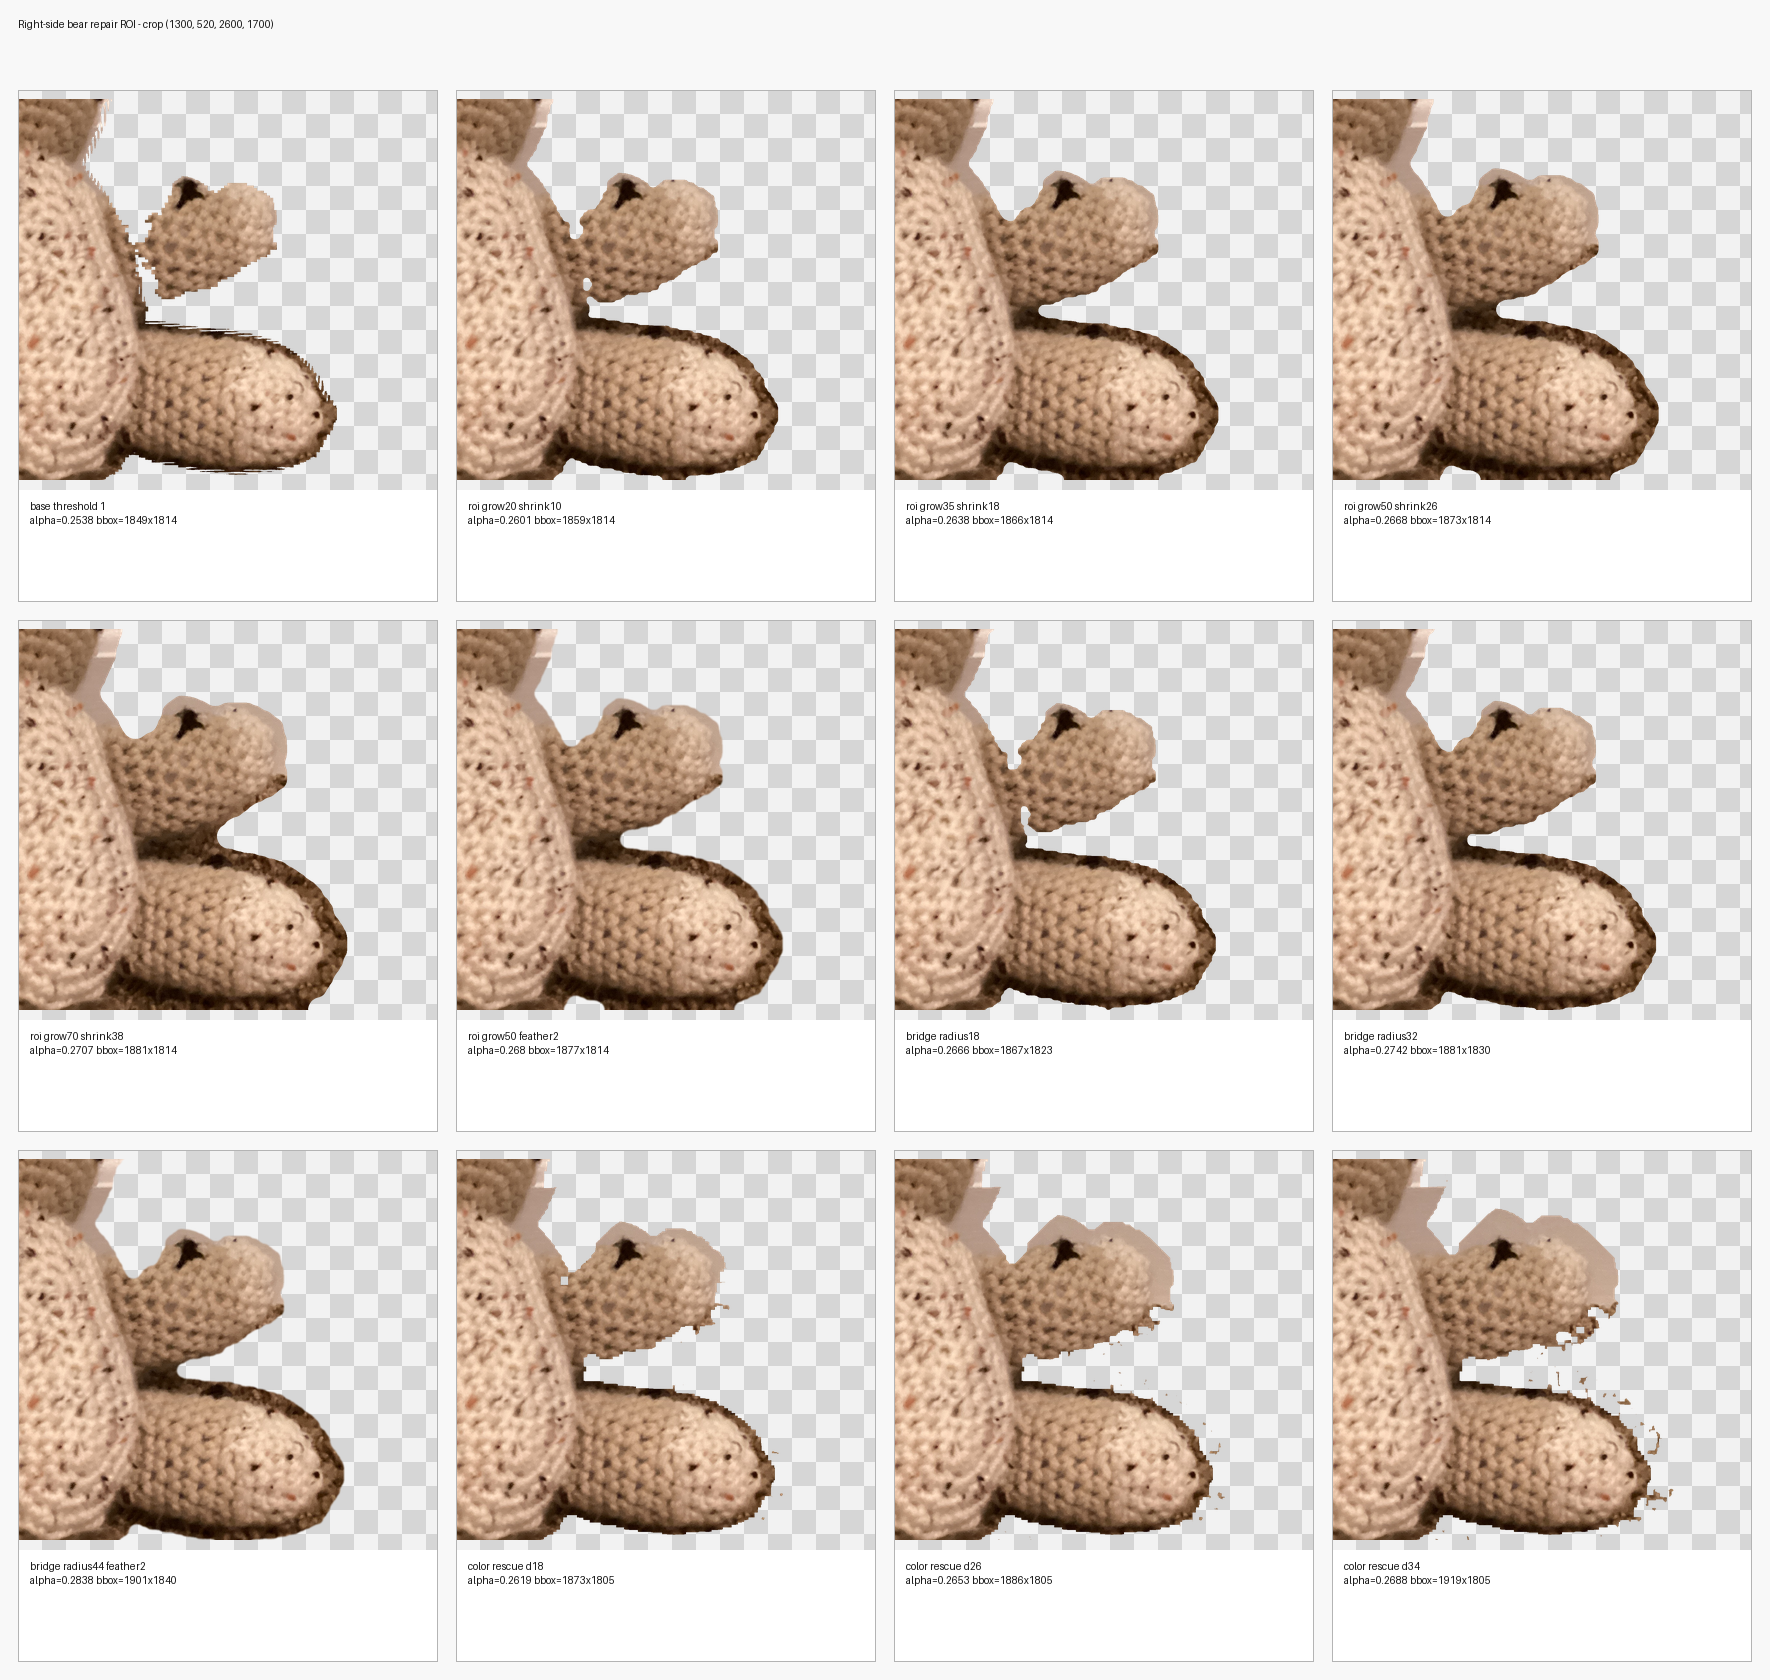
This was the useful sheet. The color-rescue variants were tempting in theory, but they pulled in carpet specks quickly. That made sense: the bear and carpet are too similar for simple color distance to be trustworthy.
The region close variants were better. roi grow35 shrink18 was conservative. roi grow50 shrink26 connected more of the appendage while keeping the carpet under control. Adding a small feather softened the result enough that it looked usable in the app.
The chosen production behavior came from that row:
mask threshold: 1
grow: 50px
shrink: 26px
feather: 2px
Making it production behavior
The production helper now asks rembg for the mask rather than the final image, then applies the same mask recipe before compositing the alpha channel back onto the original source image.
REMBG_OPTIONS = {
    "alpha_matting": False,
    "only_mask": True,
}

MASK_THRESHOLD = 1
MASK_GROW_PIXELS = 50
MASK_SHRINK_PIXELS = 26
MASK_FEATHER_PIXELS = 2.0
The implementation uses OpenCV morphology for the grow and shrink steps. Pillow's large-kernel filters were fine for tiny experiments, but they became slow on full-resolution uploads. OpenCV handled the full image quickly enough for the async helper service.
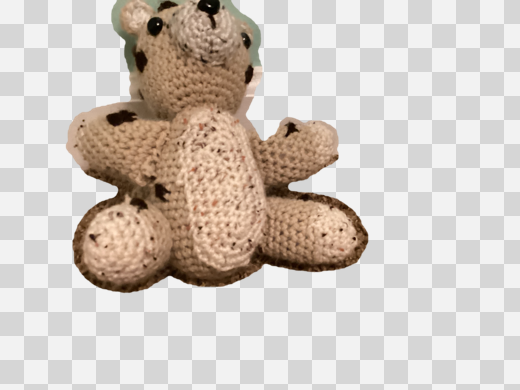
The preview on a checkerboard showed the intended tradeoff: the right appendage is preserved and connected, with a modest halo that is acceptable for keeping more of the stuffed animal.
Making old images regenerate
Changing the helper was not enough. The app already had processed PNGs on disk. Without a regeneration path, production would keep serving old files forever.
I added a background-removal version marker to each animal image record:
backgroundRemovalVersion?: string;The current version string is deliberately descriptive:
rembg-u2net-mask-threshold1-grow50-shrink26-feather2The recovery queue now treats completed images as stale when their stored version does not match the current version. On the next authenticated zoo load, recovery requeues those animals and overwrites their processed PNGs. When each job completes, the app writes the new backgroundRemovalVersion into the JSON store.
That gives future tuning changes a clean deployment pattern: change the algorithm, bump the version string, deploy, and let the app refresh old cutouts through the normal queue.
Testing summary
The testing process had three layers.
First, I built visual contact sheets. The important ones were:
- a fine alpha-matting threshold sweep
- a stress sweep with mask threshold, grow, shrink, and feather variants
- a targeted right-side ROI repair sheet
- a checkerboard preview of the selected production output
Second, I validated the helper path locally against the downloaded bear image. The local call exercised the same remove_background_bytes(...) code path that the FastAPI endpoint uses.
Third, I ran repository checks:
pnpm -C app type-check
pnpm -C app lint
python -m py_compile rembg-service/app.py
The app type-check passed. Lint passed with an existing file-length warning unrelated to the background-removal change. The Python helper compiled, and the local output had the expected alpha coverage when composited on a checkerboard.
What I would keep from this process
The main lesson is that segmentation tuning needs visual batches, not single outputs. A single cutout only tells you whether that particular result is good or bad. A contact sheet tells you what kind of failure you are dealing with.
In this case, the decisive observation was that threshold 1 found the missing appendage. That meant the model had weak evidence for the animal part, and the work moved from alpha-matting thresholds to mask repair.
The second lesson is to verify transparent PNGs on a checkerboard. Some image viewers show the original RGB under transparent pixels, which can make a correct alpha mask look like it failed. The checkerboard preview made the final behavior easy to judge.
The final production choice is not mathematically perfect. It accepts a small halo to keep more of the stuffed animal. For a playful stuffed-animal zoo, that is the right tradeoff: losing a paw or appendage is worse than keeping a little soft edge.